
![[VIDEO] Snakeskin design STEP BY STEP](https://www.indigo-nails.com/media/magefan_blog/2020/05/video_wezowe_paznokcie_krok_po_kroku.jpg)
How to make a perfect snakeskin design on your nails? Watch the next episode on our YouTube channel, take Paulina Walaszczyk's master tips and create the ideal snakeskin design using Indigo products.
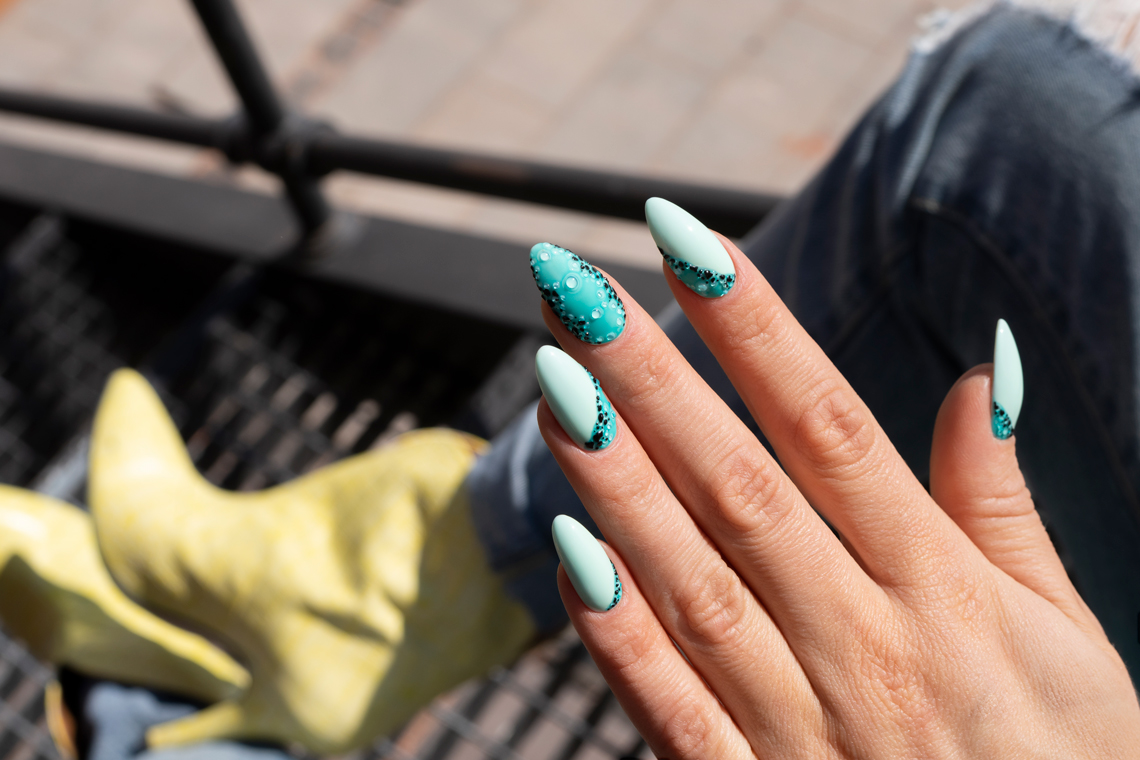
Snakeskin design on nails
Snakeskin design is a timeless pattern that always conquers the hearts of animal print lovers - and not only. In the latest episode on the INDIGO NAILS POLSKA channel, the nail master stylist and long-time Indigo Instructor presents a step by step on how to perform this design, and how to make nails look almost as natural as the real structure of the snakeskin.
https://www.youtube.com/watch?v=5rZRH3XarZE
You’ll need:
- See U Later Aligator Gel polish
- Barbados Gel polish
- Popstar Gel polish
- WOW Gel polish
- Hedonista Gel polish
- Eureka Gel polish
- Pan Ananas Gel polish
- Hokus Pokus Gel polish
- Topcoat Super Matte
- Topcoat Tip Top
- Mousee Gel – So Black shade
- Arte Brilante – Black Poison shade
- Aqua Gel
- Indigo Master Nail Art. 004 brush
- Probe
Snakeskin Nails - how to create the perfect snakeskin design on nails?
- We paint all nails with See You Later Alligator gel polish.
- When applying the 2nd layer, using a thin brush 004, add colour under the cuticles, and cure each finger individually.
- We apply Aqua Gel on the slide, and on the nail transparent gel polish glass in a turquoise shade of Barbados.
- We shape the main outline of the snakeskin. Using the probe, we apply Aqua gel on the wet layer of Barbados. Then, very quickly apply four main drops in the middle of the nail.
- We add smaller drops, arranging them relative to the already existing drops in such a way that rhombuses are created.
- We fill the sides of the nail with even smaller dots and put the hand to the lamp. We cure the design for 10 seconds.
- We skip to the ring finger. Take a Barbados with a brush and stretch the colour diagonally in the upper left part of the nail. We apply a thin layer of the product, so the Aqua drops won't spill.
- We apply the main drop with the probe and form outlines of rhombuses, adding smaller drops. We put a hand to the lamp for 10 seconds.
- Time for the little finger, where the surface with a snakeskin pattern will be even smaller. Similarly, to the ring finger, we paint an oblique triangle at the cuticle area with Barbados. We reach for Aqua, and create tiny dots, filling the entire surface. We cure the design for 10 seconds.
- On the pointing finger, using Barbados, we paint a similar bevel as on the ring finger, but in the opposite direction. The edges of the triangles should be irregular, so it looks just like snakeskin.
- We apply 2 main drops, then mark the rhombus pattern with smaller drops. The smallest ones should fill the remaining space.
- We put the whole hand into the lamp for 30 seconds to cure the design.
- On the thumb, just like on the little finger, we paint a triangle with Barbados.
- We apply a few drops of Aqua gel and cure for 30 seconds.
- We apply Super Matte on the whole middle nail and place the hand into the lamp.
- Now we'll apply shiny and mat finishes on the remaining nails - glossy layer on the colour, and matte on the snakeskin pattern. To do this accurately, we place a Super Matte on the slide, soak in the 004 brush and apply the snakeskin of each nail. We cure 4 fingers, and then we do the same with the thumb. We usually put the thumb into the lamp separately because it's opposite, and we do that when applying any product close to the cuticles.
- Apply a thin layer of Tip Top with 004 brush on the borderline of colour and design. Cover the rest of the colour using the brush from the bottle. We cure each nail separately for 10 seconds and then all 4 for 30 seconds.
- On the thumb, contouring the outline, we do the cuticles, and then we brush the remaining surface with Tip Top and place it in the lamp for 30 seconds.
- We take on Tip Top on the probe and apply the drops precisely in the same places where we previously applied them with Aqua gel to highlight an existing shape. We start with the main, middle drops moving to the smaller ones.
Note! It's important to work quickly when applying Tip Top. The sooner, the better. We cure each finger separately for 10 seconds, and when all nails are ready, we cure them all for 30 seconds.
- We do the same on the thumb as on the little finger. Cure for 30 seconds.
- We apply the second layer of topcoat onto the big and middle-size drops skipping the smallest ones. Apply a few single drops on the thumb and little finger. Cure for 30 seconds.
- The final stage of the design is to highlight the snaking structure, using black
colour.
We place black mousse on the slide and soak in the 004 brush. We apply irregular spots on the sides of the design, so the whole design looks just like snakeskin. We apply the black colour along the entire length of the sides, except for the pattern created by the diamond shapes. To have more control over the design, we start with large dots and only then complete them with small ones.
We apply tiny dots on the little finger and a bit less than on the other fingers. We cure each finger separately, and when 4 nails are done, we cure them all for 60 seconds. If you do not have mousses, you can easily use Arte Brillante Black Poison.
- We do the thumb separately.
You can also make a snakeskin design in other colour variations. Use our tips and find your perfect colour combination:
- Popstar + transparent WOW
- Hedonista + transparent Eureka
- Pan Ananas + transparent Hokus Pokus
- Pan Ananas + transparent Barbados

Published:
07.05.2020
Updated:
06.11.2023