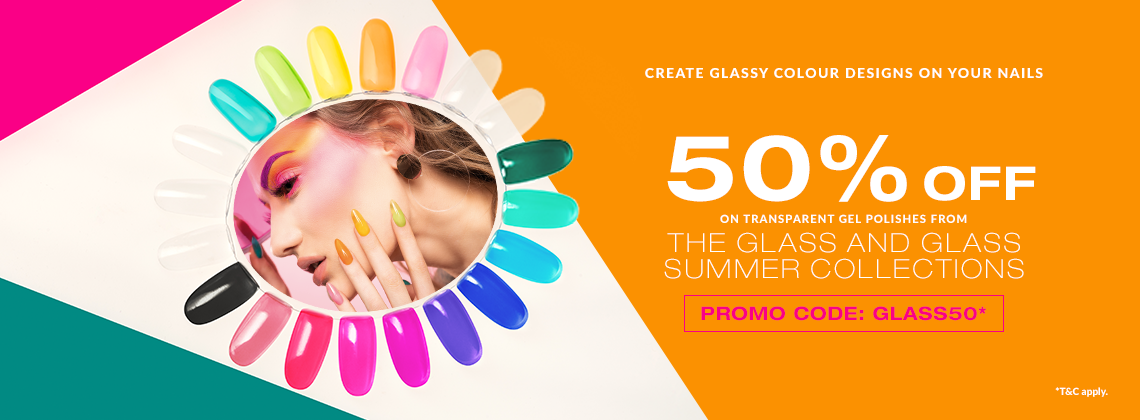
How to create a sparkling, rainbow ombre on your nails? Watch the latest episode on our YouTube channel and see for yourself the magic you can create by combining the Pixel effect with the Glass Collection.
Together with Paulina Walaszczyk, we are going to show, step by step, how to create a masterful design, glittering with all the colours of the rainbow. The Glass and Glass Summer Collection shades that can help you achieve such a remarkable effect are now 50% OFF. Enter the GLASS50 promo code and see for yourself.
In the video we’ve used:
Design NO.1
- We apply Mr White, which would be our base for this design and drive under the cuticles with a brush 004. We do the same on the second nail and put our hand into the lamp. We do not apply Mr White onto 5 nails directly, because the colour will run down from under the cuticles.
- After removing from the lamp, we immediately sprinkle the nail with the Pixel Effect. Dip your finger in the nail dust and massage without excessive pressure. Remember to smooth the entire surface well - also around the free edge.
- We clean the nails with a soft brush. We turn our hand to clean the free edge as well.
- We move to the other two fingers. We do the same as with the other two nails. We apply the colour and with brush 004 drive under the cuticles. We don't try to push the colour under the cuticles straight away, on the contrary - we add a bit of colour on the bristle a few times, so as not to flood them.
- We sprinkle a pixel on both nails, dip the finger in the nail dust, massage and remove excess with the Flower Brush.
- We paint the thumb with Mr. White and cure separately in the lamp. We apply Pixel and rub it in the dispersion layer. If the Pixel is stuck to the cuticles, we remove them with a wooden stick or cuticle pusher.
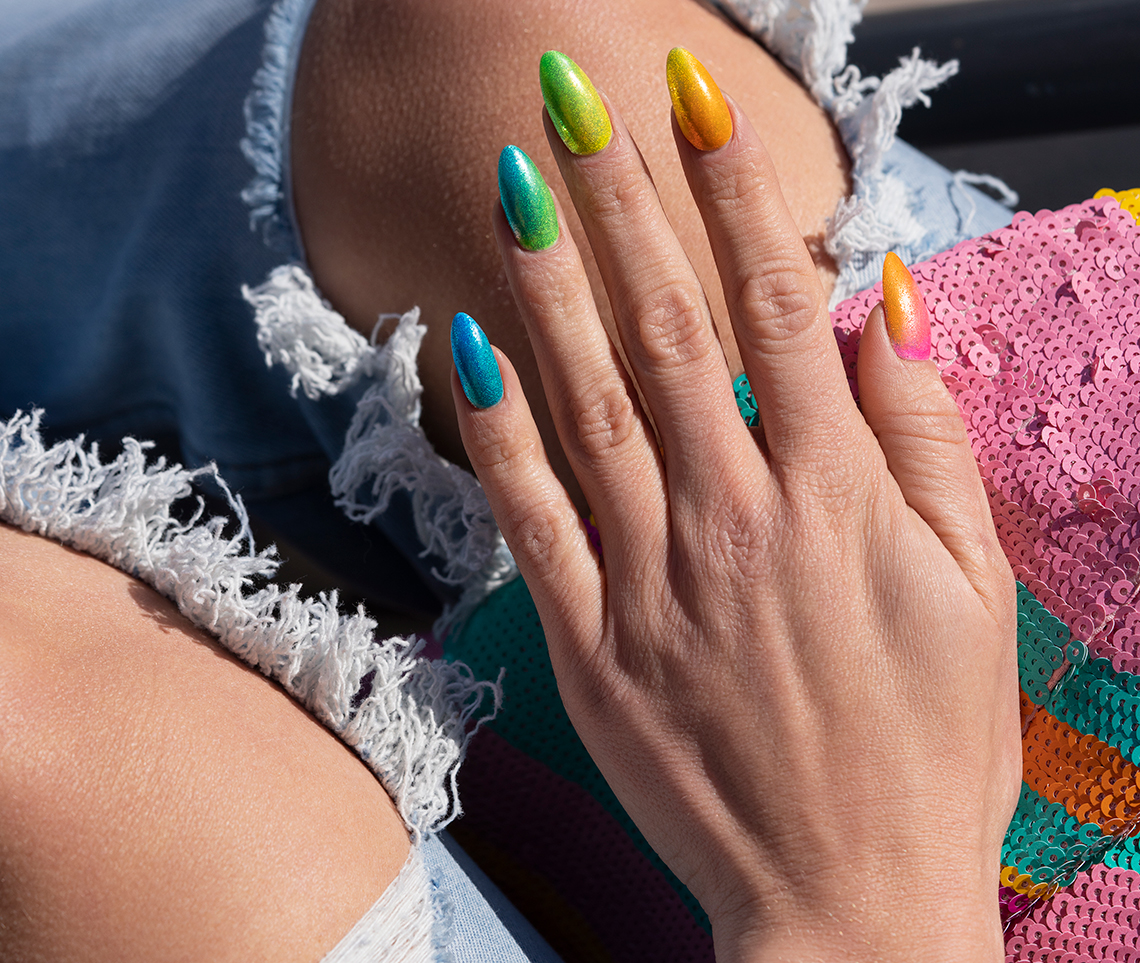
- We start painting the rainbow with a small finger. We apply Barbados, directing the colour from the cuticles diagonally. We apply H20 on the remaining surface. We brush over with Barbados, and we go back, to create the perfect colour transition.
- We apply the glass on the nail plate, and with brush 004 add the product not only under the cuticles but also on the free edge line. Cure it for 30 seconds.
- Because Barbados on a small finger must meet with the Barbados on the ring finger. We apply Hulahoop on Barbados ... and go back. With brush 004, we apply the product at the cuticles area and at the side edges. And we put our hand to the lamp.
- On the middle finger, we apply Hello Yellow at the cuticles, Hula Hoop from the bottom - also diagonally. Hula Hoop, we apply to Hello Yellow and go back. We use the brush from the bottle. The colour difference is quite visible, so before we put the brush back in the bottle, we clean it with a dust-free cotton swab. With the brush 004, we drive under the cuticles and to the free edge. We cure it.
- On the index finger, we apply the Hocus Pocus on the top, from below Hello Yellow, we overlap yellow to orange, and we clean the brush with a dust-free cotton pad. We remember the cuticles and side edges.
- On the thumb, we apply Rose Water at the cuticles, Hokus Pokus from the free edge. We apply pink on orange. With brush 004, apply the colour under the cuticles and to the side edges. Cure it for 30 seconds.
- To achieve an intense saturation, we apply a second layer of colour. It will only take a minute because we won't apply the product at the cuticles for the second time - one layer around the cuticles is enough. We use the same products that we used when applying the first layer, in the same order.
- After reaching out of the lamp, we apply Tip Top, cure it for 30 seconds, and our nails are ready.
Because we applied 2 layers of colour and one layer of topcoat, our Pixel is very well secured against abrasion. We now can be sure that our customer will come back with the same, not abraded design. Of course, if applying every layer, we were careful to apply the colour over the edges.
Design NO.2
- We cover the surface of the tips with the Mr. White and cure in a lamp for 30 seconds.
- Then sprinkle the dispersion layer with Kopciuszek Pixel using a fluffy brush. Shake excess off into the pot. We dip the finger in the pixel and move the pot aside. Massage the surface in circular motions until it's smooth. Shake off excess with a soft brush.
- We secure the whole design with a thin layer of Effect Base and cure for 30 seconds in the lamp. Remember to clean the brush with a clean dust-free cotton swab before putting it back in the bottle.
- It's time to prepare the sponge. With a sharp motion, pressing it to the blades, we cut in half. Then we cut one part in half again and cut a smaller piece out of it, which we'll use for stamping. We fix the sponge in the tweezer tool and clean it on the nail form.
- We cover around a quarter of the tips with Glass H2O, and we add a drop of Effect Base. Then blend the colour. We move here zigzag sideways and head up until the colour border blurs and we come back zigzag down. Cure it for 30 seconds.
- We repeat this, but we add a smaller amount of Glass, only at the tip of the nail. We do the ombre, and we go back. The whole design goes to the lamp.
- It's squeezing time, i.e. applying the product residue from the sponge on the tips. This is how we achieve the perfect tonal transition.
- The whole is secured with Tip Top and cure it in the lamp.
Published:
21.05.2020
Updated:
07.11.2023