![[VIDEO] How to perform spring 3D nail art with Mousse Gel? STEP BY STEP](https://www.indigo-nails.com/media/magefan_blog/2020/04/video_jak_wykonac_wiosenne_zdobienia_3d_z_mousse_gel__krok_po_kroku.jpg)
Reach for another dose of nail art inspiration and take the full possibilities of colourful Indigo mousses - this time in 3D.
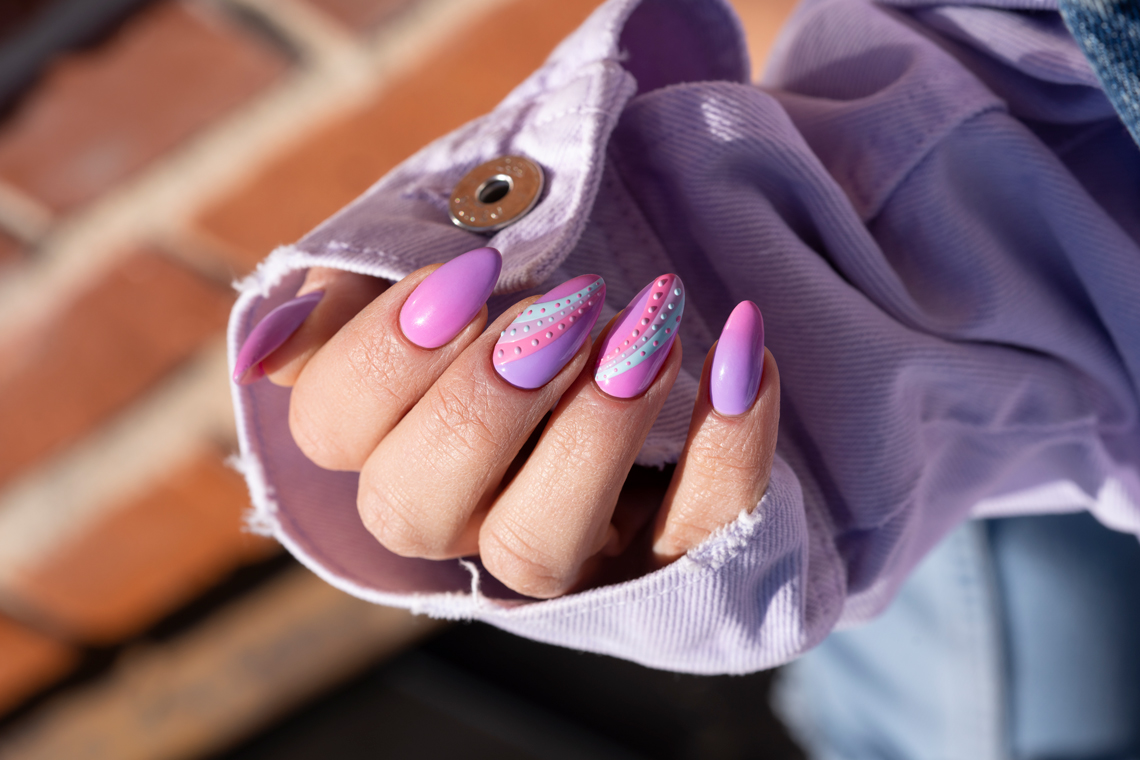
3D nail art - create a masterful styling with Indigo mousses
The prompt work pace is not the only advantage of Mousse Gel products. Their unique consistency also helps you to create ornaments with a diverse structure - both flat (which you can learn HERE) and convex, which together with Paulina Walaszczyk - a multiple master of nail styling - we explain in the next episode on our YouTube channel.
Structured ornaments on nails - step by step
The base colours will be Influencer and Pudelek. Using gel polish or mousse, we are going to make an ombre on each nail. Colourful tonal transitions will be an excellent background for our architectural ornaments.
Note! We do not press the mousse to the surface of the nail. To get 3D ornaments, we will drag a bit of mousse and spread it gently in the air. By pressing the mousse to the surface, we may get a completely different effect.
What we need is:
- Master Nail Art. Brush 004 - to work closely to cuticles
- Master Nail Art Brush 007 – for lines
- Mousse gel shades
- Influencer gel polish
- Pudelek gel polish
- Superduper gel polish
- Positivus gel polish
- See U Later, Aligator gel polish
- Arte Brillante Black Poison
- Tip Top
- Top Super Matte
Perfect gel polish ombre in shades of pink and purple
- We paint the nails alternately with Influencer and Pudelek. Cure the first layer of gel polish in the lamp for 30 seconds.
- Apply the second layer and reach for the 004 brush to push the colour in the cuticle direction. When working with cuticles, we cure each finger separately.
- We prepare the ombre sponge, cutting it properly with scissors.
- Grab the rectangular piece with tweezers and clean the sponge, pressing each side against the adhesive side of the form.
- Apply the Princessa mousse on the nails with Influencer and stamp to get the ombre effect.
- On the nails with Pudelek shade, we apply Influencer gel polish and stamp.
- Place your hand in the lamp and cure for 30 seconds.
- We apply a second layer of the same colours to get a stronger effect. Cure it for 30 seconds.
- Ombre made with mousse already has adequate saturation. In the gel polish ombre, we add an extra - third - layer.
- When the ombre on all nails has sufficient saturation, we squeeze the sponges to use the products that they have soaked fully. This trick allows you to get even nicer tonal transitions.
- Cure for 30 seconds, apply Tip Top and cure again.
How to perform 3D nail art?
- We place mousses Princessa, Blueberry Ice Cream, Topaz Blue and Marry Me on the slide. If after squeezing the Mousse Gel has a heterogeneous consistency, just mix it before application.
- Mix Topaz Blue with Marry Me to get a lighter shade of blue.
- Take on the Princessa mousse, and with brush 007 paint a slightly curved line on the nails with base colour Influencer.
- Change the brush to 004 to push the colour to the cuticles and cure the nail in the lamp for 5-10 seconds.
- We paint another line in the shade of Blueberry Ice Cream, moving it to the "pink wall" we just built. We do not press the brush to the surface of the nail, but gently pull the gel and drag it in the air to achieve a convexity. We cure the nail in the lamp.
- We reach for the 3rd colours - brightened Topaz Blue - and paint the last line.
- Cure the whole design for 30-60 seconds depending on the power of our lamp.
We work on one layer only - the product is so pigmented and so fluffy that there is no need to divide the ornament into 2 layers. We do not have to wipe the surface with a cleaner because the mousses do not leave a dispersion layer.
- We decorate colourful lines with the probe by adding 26 protruding dots. Thanks to the unique mousse consistency, we do not need to cure each of the dots. The design doesn't flow down, and we can finish our nail art with no rush.
- When everything is ready, we cure the design for 30-60 seconds.
- We apply the brightened Topaz Blue on the nails covered with Pudelek, gently pulling the mousse in the air. We use 007 brush.
- We apply the brightened Topaz Blue on the nails covered with Pudelek, gently pulling the mousse in the air. We use 007 brush. We clean the brush with a cotton swab (as always when we change the colour) and add a line in a Blueberry Ice Cream shade. We cure it.
- We clean the brush again and apply the last Princessa coloured line.
- We cure it for 30-60 seconds.
- Using the probe, we add convex dots and cure again.
You can do the same design in other colour variations:
- Ombre in Superdruper and Princessa shades + ornament made with Princessa, Aquapark, Blueberry Ice Cream and Marry Me mousses.
- Ombre in Cafe del Mar and Princessa shades + ornament made with Princessa, Aquapark, Blueberry Ice Cream and Marry Me mousses.
- Ombre in shades of Positivus and Topaz Blue + ornament made with mousses Princessa, Blueberry Ice Cream and Topaz Blue.
EXTRAS: 3D NECKLACE - 3D nail art
- We apply two layers of See U Latter Aligator, curing each layer for 30 seconds in the MULTI LED lamp.
- Cover the whole design with Super Matte and cure again.
- We place Arte Brillante Black Poison on the slide. We immerse Master Nail Art 007 brush in the product and gently brush the colour so that the brush can "drink" it.
- We start decorating by marking the intersection of the arches. We run the line in such a way that it intersects the point and rounds.
- We start painting the second arch at the height of the beginning of the first line. We lead it through the intersection and connect it to the other line at the end, creating a teardrop.
We work gently with the tip of a brush. We correct the outer contour, regardless of the additional lines inside.
- Around the middle of the first upper arch, we create another element of the necklace that runs to the centre. We repeat it on the other hand.
- We gently paint the external arches and guide them in such a way that they connect with the previous lines. We do the same on the other hand, to keep the design symmetrical.
- We paint the contours of the stones between the arches. They should be rounded closer to the centre, and in the shape of tiny rhombuses at the edges.
- Cure the contour in the lamp for 30 seconds.
- On the slide we place Mousses: Princessa, Blueberry Ice Cream and Amarantello. Marry Me is applied just next to the Princessa, because we are going to mix them using the Mixing Tool to get a light pastel pink.
- We begin filling the contour by taking on a light pink on the tip of the brush 004. Pressing a little harder, we lead the colour next to the black outline, and then fill the whole with a small amount of mousse.
- To create a bulge, we add a larger amount of the mixture for the brush tip and spread it gently, as if in the air, over the entire tear. In the same way, we fill the next two elements of the necklace, and after getting the bulge, we cure it in the lamp for 30 seconds.
- Wipe the brush with a clean, dry cotton swab and reach for the Blueberry Ice Cream. We take a minimal amount of the product on the tip of the brush to refine the colour at the contour. We create a bulge with an additional portion of mousse and put it into the lamp for 30 seconds.
- Wipe the brush again with a dry cotton swab and fill all the other stones with Amarantello mousse. We repeat the next steps, as with the previous elements of the necklace, except that the movement is minimal, and the minimum amount of the product acquired.
- We cure the whole design in the lamp for 30 seconds.
- We again apply Arte Brillante Black Poison on the slide to highlight the colour. We take the minimal amount of product with the 007 brush, correct the lines, and we cure for 30 seconds.
- Take on a little Super Matte on the brush, put a drop in the middle, and then put a tiny rhinestone on it.
- Cure whole and all done!
Published:
16.04.2020
Updated:
07.11.2023