The gel polishes from the Glass Collection are translucent colours creating a glass surface effect on the nails. Compared to the mix of standard colour and top coat, their main feature is that they're more transparent. And why mix anyway, when at Indigo ready to use product is at hand? Let's move on to today's design!
To create this decoration that we're about to show you today, you'll need:
- Acid Free Primer
- Take Your Time Builder
- Perfect Clear
- H2O gel polish
- Barbados gel polish
- Kermit gel polish
- Hello Yellow gel polish
- Hokus Pokus gel polish
- Eureka gel polish
- Black Poison – Arte Brillante Gel Brush
- Tip Top top coat
We must remember about the essential tools:
- Disposable 100/180 nail file
- Cuticle Pusher
- Cuticle 4 e-file bit
- Half Moon 180/220 polisher
- Indigo forms
- Scissiors
- 2 in 1 Gel Brush No.6
- 2 in 1 Gel Brush No.4
- Master Nail Art 006 brush
- Aquarelle Sting brush
STEP 1 – NAIL PLATE PREP
First of all, we ask the customer to wash her hands. We disinfect our hands and put on gloves to take care of the client's hands in the next step. Only then we can start work, i.e. the levelling of the free edge of the natural nail. For this task, we'll use the softer side of the file, 100/180 grit. Using the same side, gently matt the surface of the nail plate.
Protip: If the nails are damaged or delicate, use a 180/240 grit file to matt the surface.
We prep the cuticles using the Indigo Cuticle 4 e-file bit, working at maximum speed. We try to work in the air, lifting the cuticles. We work from left to right. If you're just starting your adventure with an e-file, we suggest reducing the speed to 25-27 thousand revolutions per minute. However, you don't have to be afraid of milling machines, as well as high speed. On the contrary! Low revolutions can do more damage as the bit can rotate and snap off and damage the nail.
Using an e-file saves a lot of time and effort, but incorrect use can be a source of considerable trouble. To minimize potential risks, it's best to take appropriate training, e.g. at the Indigo Headquarters - this is the best way to learn how to use this device.
Gently push the cuticles using a cuticle pusher. We cut them out using nippers, trying not to tear them but to cut them out with confidence. Otherwise, the styling may be unsightly or - even worse - we can cut the customer. Wipe the prepared nail with a dust-free cotton swab soaked in Purple Cleaner, whose task is to dehydrate the nail surface. The nail is ready. We skip to fitting the form!
STEP 2 – GEL EXTENSTION
Place the cutout form so that it fits the nail like a puzzle. What does this mean? The form must perfectly match the shape of the nail. If the form does not fit perfectly, it will later not only be visible but also felt. When the customer returns to our salon in two or three weeks, we will see the so-called 'step'. The nail may also chip off. It's better to save yourself these problems and place the form correctly.
Ensuring that everything is fitted perfectly, we seal the form and close it from the bottom, three stitches further than the target length. This time we build the nail to number 4, so we close the form at number 7. We cut the sides to release the pads so that the form does not stretch during work and cut out the sticking pieces.
Apply Acid-Free Primer to the entire natural nail plate, and next wait for the product to oxidize. When this happens, we apply the base before extending the nails, i.e. Take Your Time gel. Apply a small amount of the product using the 2in1 Gel Brush no.4. to reach every place on the surface of the nail plate. If you take too much gel on the brush, you can remove the excess with a dry cotton pad.
We add a bead of Take Your Time gel, applying it between the free edge and the form. We spread it on the nail, forming the skeleton to the target shape - in this case, the alomnd shape. Cure in the lamp for 60 seconds.
Gently remove the form, peeling it downwards so as not to damage the skeleton built. We change the gel to Perfect Clear, which we apply using Gel Brush no.4 over the entire length of the nail. This way, we create a sliding layer to allow for easier and more accurate distribution of the building layer.
Take a larger bead of Perfect Clear and apply it to the nail plate. If you notice air bubbles, try to pull them out of the gel or pierce them with the sharp end of a wooden stick.
Perfect Clear is a self-levelling gel. This means that we can turn the customer's hand upside down, and the product will level itself. Before putting the hand into the lamp, check if the gel is well distributed and if so, cure it for 60 seconds. Wipe the nail with a dust-free cotton swab soaked in Cleaner Wipe Off. Use a 100/180 file to work on the nail and give it its final shape - in our case, it will be a classic almond.
Also check: Perfect almond - how to properly build almond-shaped nails
Using a 180/220 buffer, smooth the surface of the nail. Wipe it with a cotton pad soaked in Cleaner Wipe Off, remembering to wipe it both from the top and the bottom. The nail is extended and officially ready for the next step - decorating, what tigers like the most!
STEP 3 – Glass Collection transparent nail design
We start decorating with Arte Brillante Black Poison gel, which we apply to the Nail Art Glass. We grab the Master Nail Art 006 brush, which is designed for such tasks, and with the entire bristle, we pick up a drop of the product.
Using the Master Nail Art 006 gel and brush, create an arch shape, just like when painting French, but not at the end of the nail, but at the point where the natural plate meets the extension. The black gel will cover this area, visible from under the builder gel without full coverage. We start the arch from the centre to the side while focusing on making it thicker in the middle and as thin as possible at the ends. To paint the line the other way, we turn the model's hand.
The arch must be perfectly symmetrical. To achieve this effect, we turn the hand over every time and check if the lines go the same way. Without changing the perspective, it could turn out that the lines are not perfectly painted, and instead of a symmetrical arch, they resemble a more crooked boomerang. When we find that the lines are perfect, we cure whole in the lamp for 30 seconds.
The next step is to paint a thin line on the edge of the nail. To do this, dip the entire bristles of the Master Nail Art 006 brush in the product - if there's too much, the excess can be put on the slide - and paint a narrow line. If there's not enough product, we will use the leftovers from the slide. We strive to connect the arches on both sides, ensuring that the line is of the same thickness. Finally, we cure in the lamp for 30 seconds.
PROTIP: If, after building the nail with clear gel, air bubbles appear, you can remove them with Acid-Free Primer. This way, we mask "uninvited guests". It does not penetrate but remains on the surface, forming a sticky layer. Air bubbles are more visible if we use a camouflage product - Acid-Free Primer is especially helpful in such situations.
Glass Gel Polishes – translucent colours application
We add a drop of colours from the Glass and Glass Summer collections on the Nail Art palette: H2O, Eureka, Kermit, Hello Yellow, Barbados and Hokus Pokus. These are, of course, the colours that we have chosen for today's design - the choice of colours is always an individual decision, based on the stylist's idea and/or the client's wishes! There are as many as 15 Glass colours, so you can let your imagination run wild.
Using the Aquarelle Sting brush, we take a bit of Hokus Pokus on the tip of the bristles. We apply a thin layer on the nail plate punctually. Since Glass gel polishes are transparent, we can also gently approach the black arch. After applying the top coat, it won't be visible. After using each colour, it's necessary to clean the brush with a dry cotton swab - we do not want to mix the shades with each other.
Another colour we choose is Eureka in the fuchsia shade. The next one will be beautiful H2O, which we also rub into the chosen area. Later, we use Kermit and Barbados, as with previous colours - punctually and singularly. The last one will be Hello Yellow, which will beautifully finish our design. Cure for 30 seconds.
Protip: The order of the colours, in this case, is entirely random. When you do this, you can - as in the case of colours - make your choices!
What if the applied colours seem too delicate or not visible enough? It's not a problem - apply another layer of gel polish to add intensity. However, it must be done punctually and accurately. The unevenness remaining after the application of the subsequent layers is also not a problem - the whole thing will be secured with a top coat that will level the surface.
Speaking of the top coat, we apply Tip Top on the cured surface, which does not leave a sticky layer. By using it, we even out the resulting kinks or unevenness, obtaining a perfect surface.
We take a bit of Arte Brillante Black Poison on the Master Nail Art brush 006 and paint the stained glass elements. We can go slightly beyond the black arch with this decoration - here, you can entirely run crazy with fantasy. We don't create straight lines. We bend them slightly. We cure the whole thing for 30 seconds - we don't apply another layer of the top coat, because Arte Brillante gels do not have a sticky layer.
PROTIP: Each painting stage can be cured in the lamp to "save" decoration progress. If any of the lines don't work out, you won't have to remove the whole thing and start over. This way you can save a lot of time - it's a perfect option, not only for beginners!
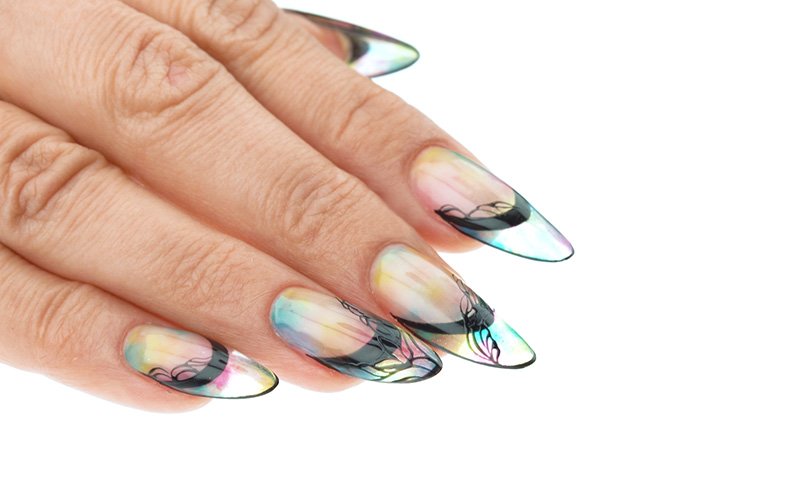
Transparent Nails – Voila!
And this is it! - our transparent decoration is ready! Of course, this is just our proposition - yours may be quite different. As we mentioned earlier, it's sometimes worth letting your imagination run wild and going crazy with the colours in the case of the Glass gel polishes. By the way, we have a special offer for the Glass Collection - get a 50% OFF on all Glass & Glass Summer shades. The offer ends on 30/06/2021. Grab the promo code, click here.
If you want to learn more about nail styling techniques, products or inspirations, check out the other articles on our blog! Also, remember to subscribe to our YouTube channel. Every Thursday at 5:00 pm, expect a new episode, full of knowledge and good vibes. See you soon!
Published:
18.06.2021
Updated:
06.11.2023