Anyone will say that Indigo is a manufacturer of nail styling products, and that is true. However, it's worth mentioning that it's also a community of people involved with the brand! A group that includes, among others, nail stylists. They often share their ideas and needs with us. And it was from them that the concept of the new caps came from. So, what is the change? How to properly apply colour? Read the article and find the answers to your questions!
New caps - where is this change coming from?
Not every nail technician has a space in their salon to present all the colours. It's also not a very convenient solution - if you want to reach for a different shade, you have to get up every time. Most stylists keep their colourful treasures in drawers - handy and easily accessible. The only downside? It isn't easy to see the colour when looking at the bottle from the top.
New caps are the solution to this problem. One look is enough to see all the colours and choose the ones needed for the current design. This will not only speed up your work but will also reduce the stress - after all, nothing annoys you more like looking for a gel polish that is here somewhere!
New self-painting caps
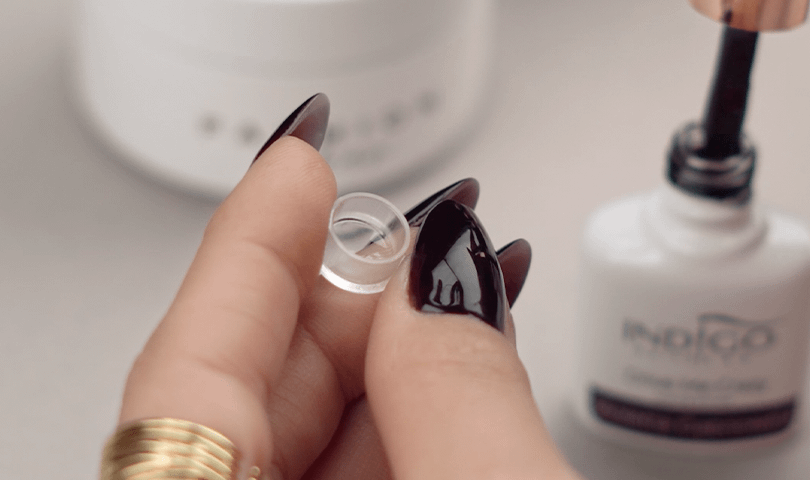
The construction of new caps is very straightforward. The cap that also serves as a brush holder remains almost the same as before. The only difference is the tip, which has a transparent cap, placed in the appropriate cut.
See the video on how to apply the colour so that everything fits perfectly:
New caps - painting tips
For the colour to be visible, it must be properly applied - a wrong application may make the sidewalls of the cap too thick, and it will not be possible to put it on. What to do to avoid this situation? Follow the steps below:
1. Remove the cap from the top and place it on the table with the opening upwards - so that it forms a bowl
2. Unscrew the cap and lightly drain the product from the brush
3. Drip one drop of the product inside the cap so as not to soil the side walls
4. With gentle, circular movements of the cap, spread a drop of the product on the bottom
5. Cure in the lamp for 30 seconds
6. Put the cap back, and it's ready!
What not to do?
Although it may seem a simpler and faster solution, painting the bottom of the cap with a brush is not the best idea - the colour will also land on the sidewalls, which will become a bit thicker. However, this is enough to prevent the cap from slipping into the prepared cutout.
I placed an order, and I don't have new caps. Why?
There may be two reasons for this. First of all, we introduce new caps only for gel polishes and mineral bases - in these cases, we deal with coloured products. The caps of the remaining bases and tops remain unchanged.
The second reason is the fact that we replace the caps in the entire assortment successively. This means that in the case of some gel polishes and mineral bases, old versions of caps may still be present for some time. However, there's nothing to worry about - the product is the same, and that's the most important thing!
Published:
13.10.2021
Updated:
07.11.2023