![[VIDEO] Black & White nail art designs STEP BY STEP](https://www.indigo-nails.com/media/magefan_blog/2020/06/video_czarno-biale_wzorki_na_paznokciach_krok_po_kroku.jpg)
Who said that nail designs always have to be colourful?? See the next episode on our YouTube channel that black and white nail looks can be equally phenomenal. Take advantage of Indigo's master tips and learn how to choose the right products and what to look for to get the best results.
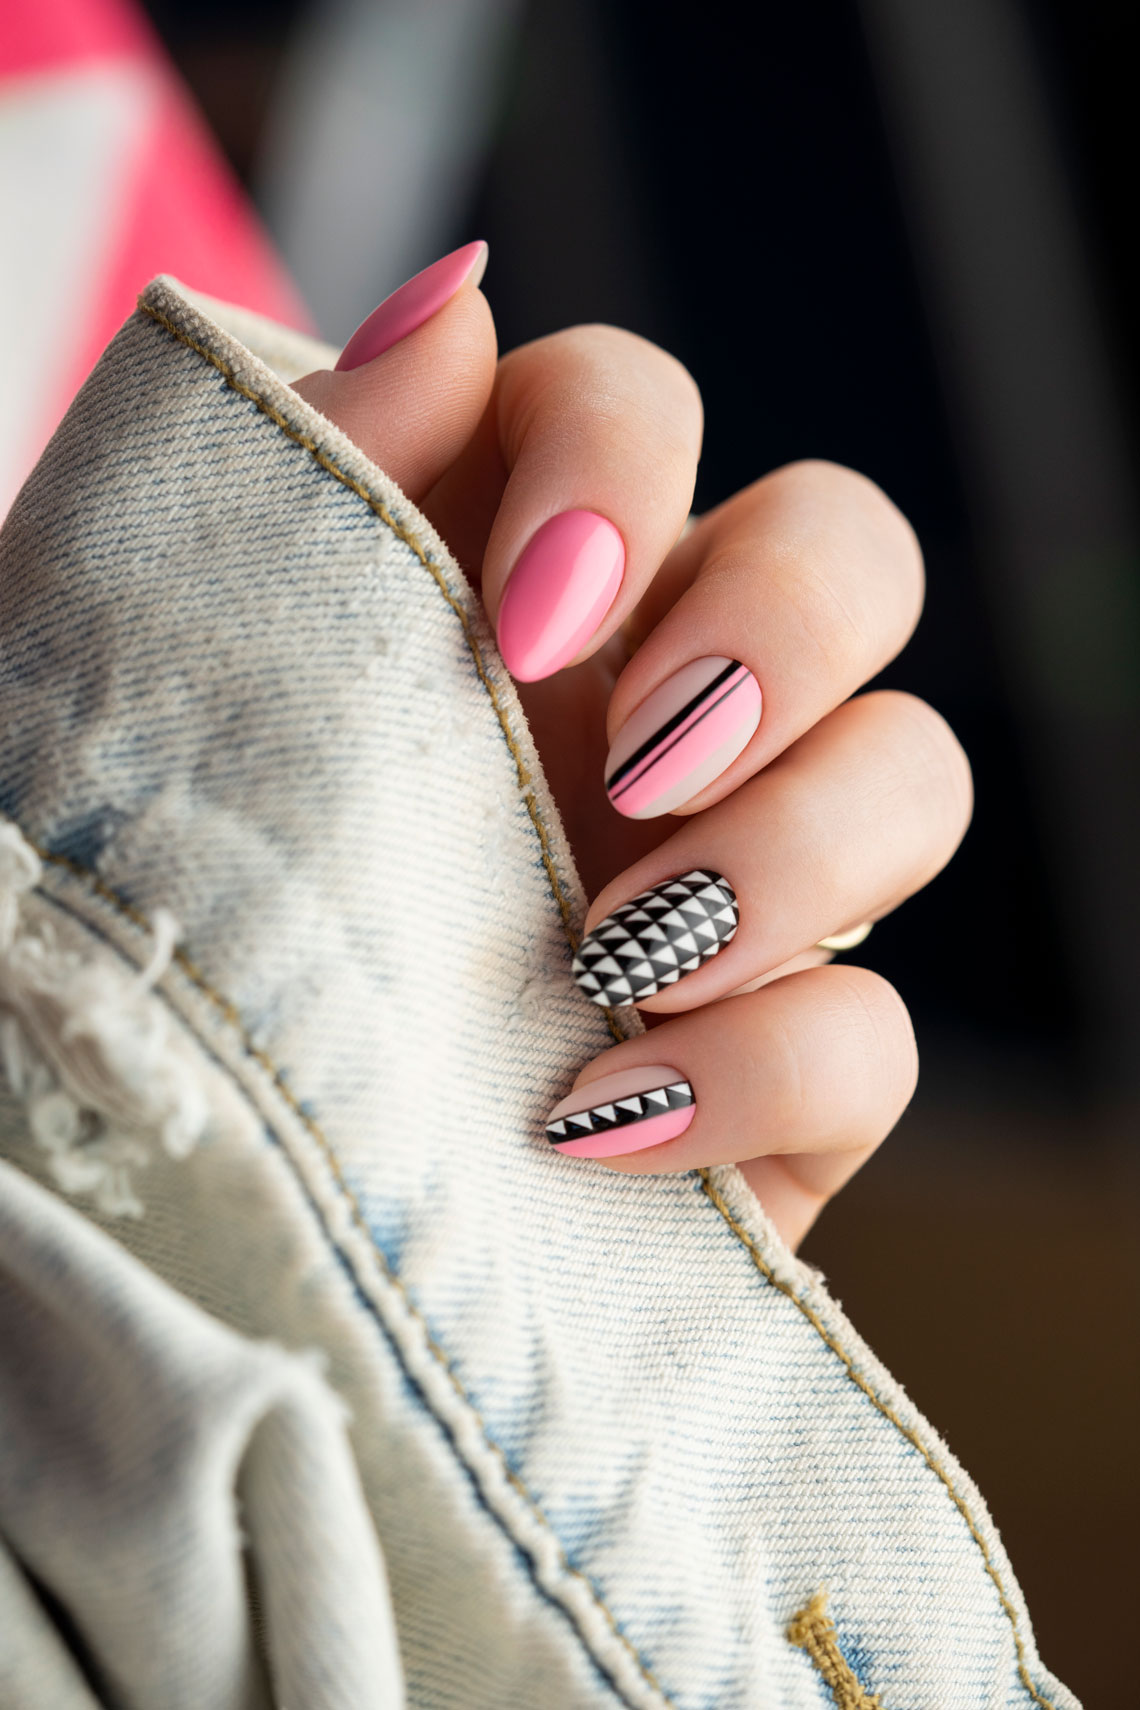
Black and White designs can be worn in many ways. With neons, subtle pastels, deep cherries, on one nail, on two or five - as you wish. They are universal, so it's good to have them in the offer. If the customer would like some design, but doesn't know what that could be, then these black and white geometric design is a great idea. Get inspired by the looks of Katarzyna Wojtczak, from the Indigo Headquarters in Łódź, and introduce black & white decorations to your regular repertoire.
The products we used in the video:
- Mr. White gel polish
- Mr. Black gel polish
- Say Yes gel polish
- Arte Brillante White gel
- Arte Brillante Black Poison gel
- Master Nail Art. 007
- Aquarelle Sting brush
- 220/280 buffer
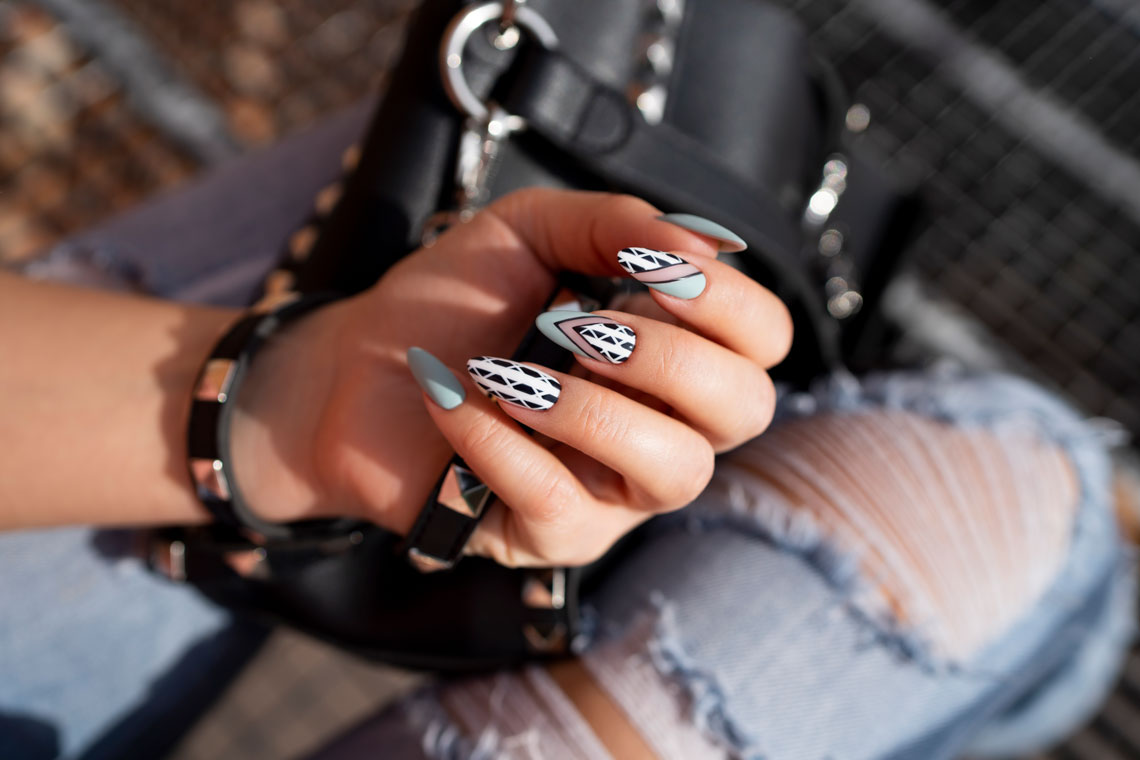
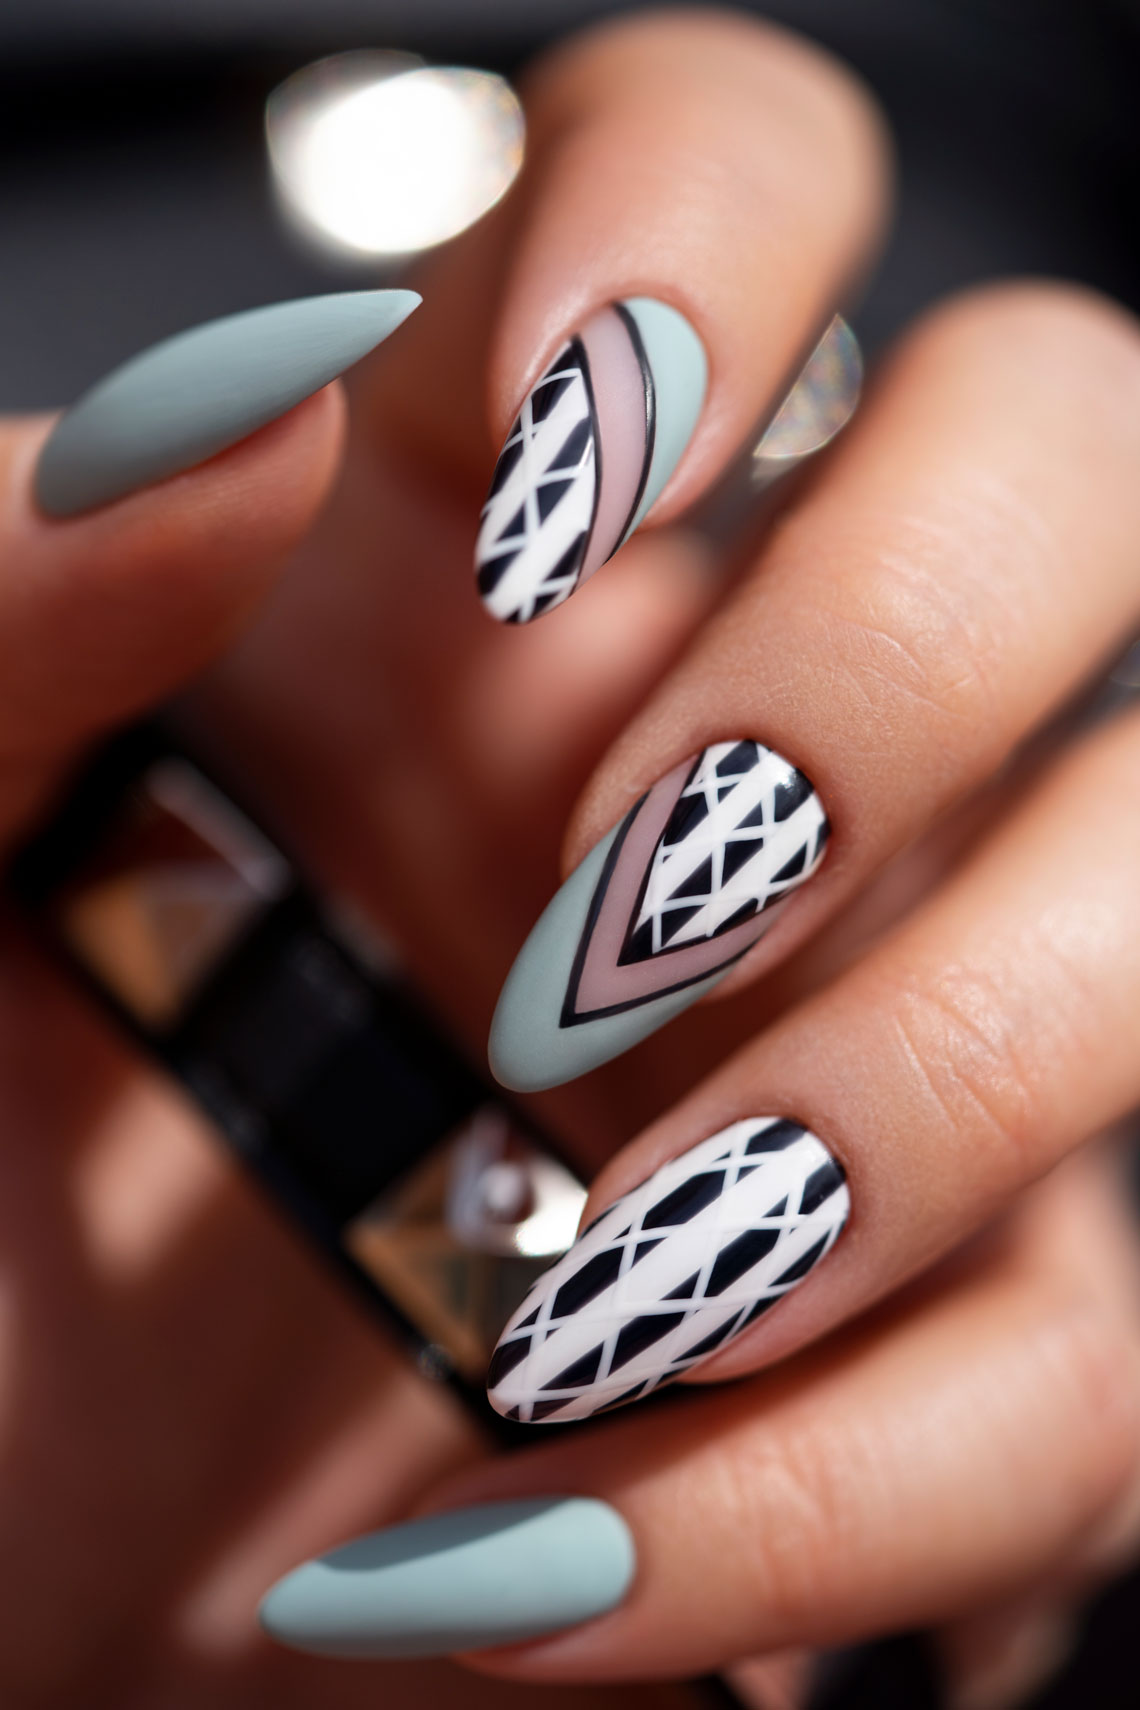
Nail Art Look no.1
Black and White geometric designs on nails
- We apply one layer of Mr.Black and cure.
- Using the white Arte Brillante gel and the 007 brush, we divide the nail evenly in half, and each half in half again. We run the line slowly and precisely. We cure it.
- Using 007 brush to paint the diagonal lines along the entire length of the tips. There are a few things to keep in mind here. Firstly, be patient and breathe. Secondly, pay special attention to the fact that each subsequent line you paint is parallel to those already completed. We also make sure that the distances between the lines are fairly symmetrical. We cure it.
- It's time for the last element of this design. We paint the line in the middle of the tip, guiding the brush from left to right, from the bottom up. Here we do not have to focus on being parallel. It's enough that the lines will start and end with the already existing lines.
- We apply Tip Top, which is our bestseller when it comes to the category of top coat gel polishes with no dispersion layer. We must remember to wait about 10-15 seconds after reaching out of the lamp and before we touch the nails... and it's ready!
Nail Art Look no.2
Black, white and a bit of sparkle - how to do a black and white manicure?
- We apply Whitemin Base on the entire nail and cure.
- Using the 007 brush and black Arte Brillante gel, we divide the tips in the proportion 1:2 vertically, and this will be our ornament axis. We paint a thin line starting from the upper left corner, to get a triangle. We fill the contour using the thicker Aquarel Sting brush.
- On the other side, paint the lines directing them to about 1/3 of the height of the tips and fill the remaining shape.
- We clean the brush and reach for the white shade. We create lines ensuring that they are parallel to the sides. We fill them preferably with a slightly thicker brush.
- To cut off the white pattern from the milky surface, we paint black lines.
- To get a matte finish, apply Super Matt and cure for 30 seconds.
- We add the cherry on top: a shiny accent in the form of Prosecco Mousse Gel. If you don't have the Prosecco, it's fine. There is a gel polish Say Yes, which is very similar and will blend in well with this design. We cure the whole again.
Nail Art Look no.3
An idea for black and white nail designs
- We apply Mr.White and cure for 30 seconds.
- Although Mr. White has excellent coverage, in this case, we apply a second layer to achieve a slightly thicker layer. We would need it to avoid breaking through the colour when matting the surface, which we'll do in a minute. We cure it.
- We wipe the nail with Wipe Off and move to matting the surface with a 220/280 buffer, to make it easier to draw.
- We divide the tips with a pencil in half.
- On the right side of the nails' edge, we mark the point which should be exactly in the middle of its length. Similarly, we do the same on the opposite side.
- We draw a horizontal line from the central line to the designated point. The next ones are also created from the central line but slightly expanding at equal intervals from each other but ending at one and the same point on the side of the tips. As a result, we should end up with stripes that are wide in the central part of the tips and narrow towards the sides.
- With the brush Master Nail Art. 007 and Mr. Black gel polish, we outline the pencil line, and we move to fill. We apply the colour every second stripe. Just to be sure, we cure a quarter of the design, correct the central and bottom lines on the right and fill with colour. We cure it.
- Cure and move to fill the second half. We do the second half in the same way as the first one. We contour the pencil lines, fill the stripes with Mr. Black and cure.
- We cover everything with a Tip Top top coat, cure for 30 seconds and it's ready!
Nail Art Look no.4
How to do black and white plaid design?
- We apply one layer of Mr.White gel polish and cure for 30 seconds.
- Similarly, to the previous design, we create a line in the middle of the nail to get two halves and then divide each of these halves again. We divide each of the halves
toin half again. - We place the hand into the lamp and cure to be able to proceed to the next stage of the design.
- We paint horizontal lines on the entire length of the nail. We use black Arte Brillante gel and 007 brush - a perfect duo for tedious, demanding designs. Place the hand into the lamp and cure. This way, we obtained a plaid pattern, which will work as guidelines for the next stage of this design.
- We divide each of the squares diagonally in half so that the diagonal lines from the squares form one straight line. We cure it.
- We move to the final element of the design. We will fill every second triangle and cure.
- We secure the whole design with Tip Top top coat and Voila!

Published:
11.06.2020
Updated:
06.11.2023